Horse Hoof Anatomy - Explored via a Hoof Dissection
I created this page to help deepen the understanding of horse hoof anatomy. Using a cadaver hoof I have taken a series of photos whilst undertaking a hoof dissection. My main aims with this dissection were to show sole and wall thickness, coffin bone location in relation to the sole and wall, lateral cartilage location and digital cushion consistency.
Warning - the following images are pretty graphic in nature.
November 2013 - added photos of the bones from this dissection
Hoof Prior to the Dissection
|
This cadaver hoof is a front hoof was used for practice trimming on at one of my trimming clinics. We know nothing of the history of this horse. | |
|
The heels are underrun and the toe angle is low. He appears to be too short in toe height (from the coronet straight down to the ground). | |
|
This hoof is fairly uncontracted but the frog and digital cushion are not very robust. | |
|
The back of the foot is nice and wide but the digital cushion and frog are not very full. | |
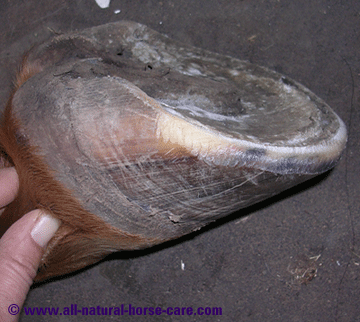 |
This hoof has some concavity but the sole flattens off towards the wall which indicates that there may not be full sole thickness. |


Horse Hoof Anatomy - The sole and walls
|
I started by removing some of the hoof wall to discover the sole thickness and locate the lower edge of the coffin bone (P3). The sole is thicker at the back of the hoof which confirms my initial
suspicions about the sole not being full thickness throughout. This
horse would have been much more comfortable had he been given the chance
to develop full sole thickness but the flaring and low toe angle and
underrun heels prevented him gaining correct toe height. | |
|
This angle shows the wall thickness. | |
|
Here I removed the sole on one side of the hoof to reveal the sole corium (blood filled gel pad) which aids in shock absorption and produces the sole horn. | |
|
This photo shows the frog corium from the top. | |
|
This photo shows the frog corium from the side and on this horse it is very close to the surface of the frog in places. This is known as a prolapsed frog corium/digital cushion and proves that this was not a very healthy frog. | |
|
Removing the thin layer of frog corium reveals the digital cushion. | |
|
Close-up view of the digital cushion: which was very fatty looking and soft. A healthy digital cushion will be much denser as it responds to stimulation by producing fibro-cartilage. By the looks of this digital cushion this horse did not get adequate stimulation to properly develop it. | |
|
This is a slice through the corium and laminae - the corium is on the bottom side of the photo and the laminae on the top. The corium was attached to the coffin bone and the laminae connect the coffin bone to the hoof wall. The laminae appeared to be fairly healthy but the corium seemed quite thick and I wonder if this was an adaptation to long term flaring? | |
|
This is a slice through the coronet (coronary) band. The skin is on the top side of the photo. The small holes in the coronet band are the tubules which grow down and contribute to the hoof wall. The laminae and corium are at the bottom of the photo. |


Horse Hoof Anatomy - Lateral Cartilage
|
This is a slice through the lateral cartilage which on this horse is quite thick and encompasses some blood vessels. Dr Bowker found that on some wild horses the lateral cartilage can be up to an inch thick - this one was just over half an inch which is pretty good for a domestic. However this may have been a result of undue stress as the cartilage had started to ossify (turn to bone) where it connected to the coffin bone. | |
|
The lateral cartilage is the whiter area below the hair at the top of the photo. It extends down and connects onto the coffin bone. It was hard to find the lower edge as it had started to ossify. | |
|
Here I have removed the lateral cartilage to reveal the Coffin Joint which consists of P2 (short pastern) and P3 (coffin bone). | |
|
This is a close-up of the Coffin Joint. To the left of the picture is the top of the hoof wall (just below the hairline) The top of P3 (the small semi-circular shape just to the right of the middle of the photo) is level with the top of the wall which is good as it means that the coffin bone has not sunk (there is no distal descent). |


Bones
|
These are the bones from the above dissection. I buried them to remove all the soft tissue. They are wired together, hence the disparity in the joints. Notice how the angles of the sides of the coffin bone are fairly symmetrical unlike the angles of the hoof wall on the original photo. | |
|
There is some sidebone (ossification of the lateral cartilage) on the left hand side and the bone is thickened on that side. | |


I hope you enjoyed this basic hoof dissection and the insights it gave into horse hoof anatomy.
Want to Learn More?
|
|
If you want to discover more about horse hoof anatomy please visit my other website: |

Return from Horse Hoof Anatomy to All Natural Horse Care home page