Hoof Education - What makes a good hoof?
Does your horse currently have healthy hooves? Find out with this hoof education page. It will help you identify some common issues that often get overlooked.
Hoof Education: Quality of the Hoof Wall
The hoof wall should look smooth on the outside (without it being rasped). If you see bumps (growth rings - photo above left) then that can be an indication of a problem. Growth rings relate to a time of stress for the horse and it is fairly easy to put a timeframe on the rings - just like you can with trees. The cause of the rings can be many and varied but, laminitis, caused by grass that is too rich in sugar, is often a major player.
Horizontal cracks (photo above center) are usually a sign of an old hoof abscess. They normally grow out without too much trouble as once the abscess has burst it seals itself up on the inside to prevent further infection.
Vertical hoof cracks (photo above right) can be much more serious and tend to be due to an imbalance of the hoof. They will not grow out until the imbalance is dealt with. Often the crack is home to fungus and/or bacteria which need to be treated to allow the hoof to heal.
Hoof Education: Straightness of the Hoof Wall
The hoof walls should grow in a straight line from the hairline down, as illustrated in the photo on the left (above). When you drop a line through the center of the hoof there should be approximately the same amount of hoof on either side of the line. (This does vary slightly, more so on the hinds where the inside wall is often more upright that the outside wall.) Note how the growth from the coronet parallels the width of the hoof wall (the distance between the red and outer yellow lines).
The second photo appears at first glance, to have straight walls but when you look at the sole view the flares become evident. The green lines indicate where the healthy hoof wall should be.
The third photo shows a hoof with flare on one side. This is confirmed on the sole view when you measure the distance from the middle yellow line to the outer yellow lines. This reveals that there is more hoof to the right of the line. The green line indicates where the hoof wall should ideally be.
NOTE: the sole views are flipped for illustration purposes.
Hoof Education: Angle of Growth at the Toe and Heel
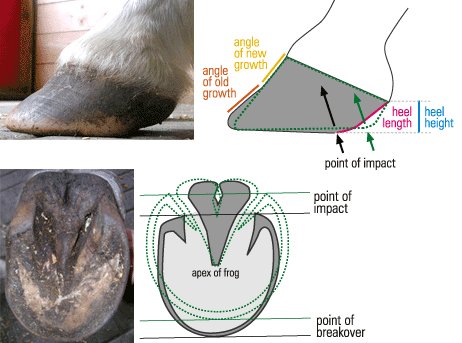
At first glance this photo above shows a horse with a fairly low looking heel height (blue line). However if you look closely you will see that the heel length (marked in pink) is actually too long. This is called an under run heel and it is where the heel grows at too low an angle. This is a common condition that is often misinterpreted - many people only see how low the heel bulbs are to the ground and so want to grow more heel. However this just compounds the problem. See how far under the hoof the point of impact already is? By allowing the heel to grow longer the point of impact ends up even further under the hoof. This is often how navicular starts because the impact force is in the wrong place.
Notice the angle of growth from the hairline down to about half way down the hoof capsule (yellow line). See how the angle changes (orange line). This happens when the toe is too long and the point of breakover too far forward.
Also note the shape of the foot when viewed from the bottom. It is oblong rather than round, again because the breakover is in the wrong place. The green lines show where the hoof should be - with the point of impact of the heels further back under the horse and in line with the back of the frog. The toe also needs to be brought back to allow the hoof wall and coffin bone to grow in a tight connection.
Hoof Education: Hoof Length, Concavity & Depth of the Collateral Grooves
The length of the hoof is depended on the health of the hoof. When the hoof is unhealthy it often grows in excess in order to help protect the weaker parts. In a healthy hoof the hoof walls are just slightly longer (1/8" or 3mm) than the level of the naturally concave live sole.
The ideal depth of concavity you are looking for is approx 1/2 - 3/4" (13-20mm). "How do I measure that?", I hear you ask. Well first lay a flat surface, such as a rasp, across the sole of the hoof. Then take your hoof pick and push it down into the collateral groove at the rear of the hoof - between the bar and the frog. Put your fingers at the point where the hoof pick meets the rasp. Pull out the hoof pick (keeping your fingers in place) and measure from the tip of the hoof pick to where your fingers are. This will give you the measurement at the heels. Then do the same at the apex of the frog. If the measurements are below the range then you have a horse with a short hoof and a thin sole. If they are above the range then the hoof may be too long.
Hoof Education: Hoof Shape
The ideal shape of the front hoof is shown on the left in the illustration below and the hind hoof on the right. The hinds tend to be more pointed because they are used to dig in and push off to propel the horse forward.
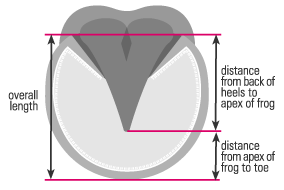
The ideal ratio of the hoof, when viewing the sole, is 2/3rds to 1/3rd. This translates as the distance from the apex (tip) of the frog to the back of the heels is 2/3rds the overall length; and the distance from the apex of the frog to the edge of the toe is 1/3rd of the overall length.
However, be sure to take the measurements from the true apex of the frog - sometimes the frog grows forward so it may need to be trimmed back a little to reveal to the true apex.
Also be aware of the shape of the hoof - sometimes when the hoof is more oblong the ratio may appear correct but in fact it is not as the whole foot has migrated forward.
Hoof Education: Quality of the Frog
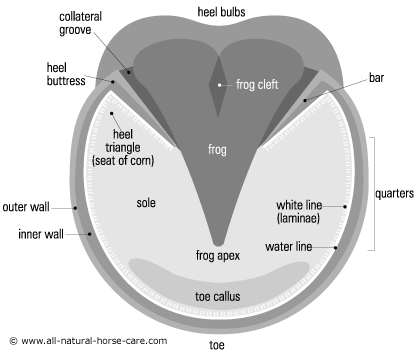
A healthy frog is full, plump and level with the heels. The ideal texture is like a hard rubber/eraser and the central cleft/sulcus should be open. If the frog is tatty looking or if the central sulcus consists of only a crack then there is probably thrush lurking in there.
Hoof Education: Quality of the White Line
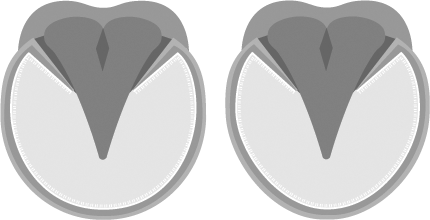
A healthy hoof has what is know as a "tight" white line. This is the connection of the laminae between the hoof wall and the coffin bone and in a healthy hoof it shows up as being approx 3-5mm wide.
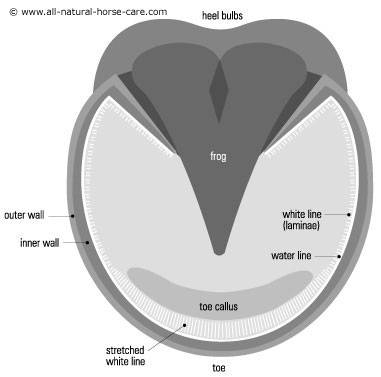
The illustrations below show a healthy hoof first and a hoof with a stretched white line (at the toe) second. The white line looks like stripes between the sole and the hoof wall and is much more visible when stretched. Stretching at the toe is normally an indicator of rotation of the coffin bone as a result of laminitis or it may be from excess flaring of the hoof. View more barefoot hoof diagrams here.
 |
 |
Deepen Your Understanding of the Hoof and Lower Limb
Online Distal Limb Anatomy Course

Want to learn more about how to read the hoof so you can make informed trimming decisions? Featuring our world-renown high quality dissection photos, along with videos & detailed commentary, this is our most comprehensive body of work to date.
You will get lifetime access when you purchase this course, so you can watch it as many times as you like, at your own convenience. Individual modules also available.
Modules include:
- Terminology
- Conformation
- Bones of the distal limb
- Hoof production
- Tendons & ligaments
- Back of the hoof
- Distortions
- Test your knowledge