Natural Horsemanship Halter - Learn How to Make them Yourself
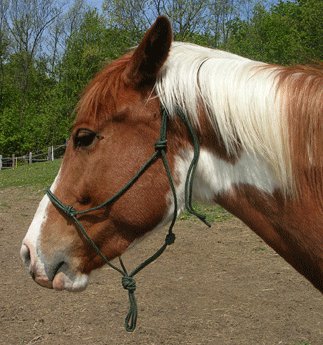
Want to save a whole heap of money by making your own Natural Horsemanship Halter? It takes some patience the first time you do it, but once you get the hang of the knots it's very satisfying to do and you can get creative with colors and embellishments. Here's how...
Tie a First Class Natural Horsemanship Halter
by Connie Nygard
Materials needed
20 feet of 1/4 inch polyester rope.
Matches to melt and seal the ends of rope (or to burn these instructions if you get frustrated).
Note
These directions are for an adult horse with a small head. I use 18 feet of rope but you may need more for a bigger head.
If you get confused it is best to untie all knots and start over.
Caution:
- Do not leave any halter on a loose horse.
- This halter may break if a horse is tied up with it.
- This halter may cut if a horse fights it.
- Not recommended for tying a horse in a trailer.
- Not responsible for misuse of halter.
Directions
Tie simple knots at the distances shown below. Measurements are from knot to knot and do not include knot. Make the knots firm but not tight because you will be bringing the rope back around to tie into those knots. The last knot in about the middle of the rope is a knot with a loop for the tie loop of the halter.
After you tie the tie loop you go back and tie into the knots you have already tied. (Editor's note: make sure you lay out the rope in front of you exactly as shown - otherwise it's very easy to get lost when you start to tie back into the knots!)

To tie into a knot, loosen knot and tie into knot following rope path.
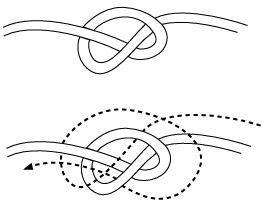
Tie into the left nose knot first. Then then right nose knot to make a double rope over the nose. (Editor's note: remember to keep the rope laid out as shown...you'll regret it if you don't!)
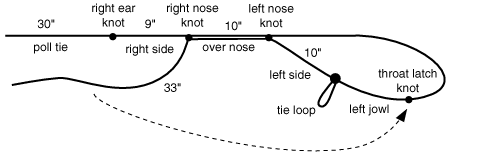
Tie into the throat latch knot. Arrange halter as shown so it makes sense. And tie into the right ear knot.
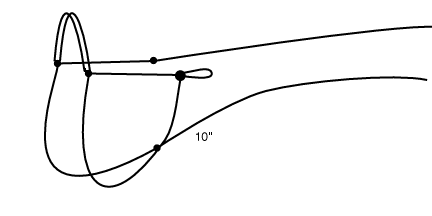
Gather the two 33inch sections and tie a big ugly knot at the chin. Test all knots before putting halter on horse. If halter falls apart, knots are not tied correctly. Untie all knots and start over.
Slip knots to adjust size of halter. Trim tie ends the same length and melt them with a match to seal the ends. I don't attach the two ends together.
© 1995 Connie Nygard - These instructions may be given away but not sold.
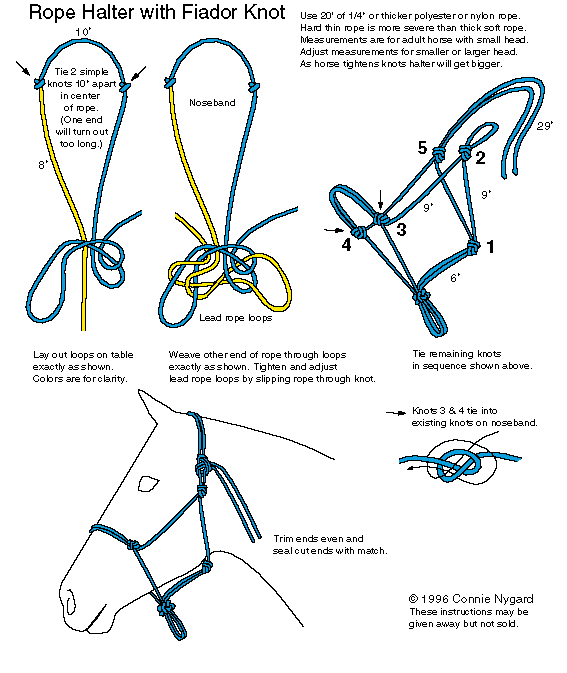
Now if you are feeling really brave and confident after completing that one, you can get even fancier by using the instructions below for a halter with a Fiador knot...
Natural Horsemanship Halter with FIador Know
Return from Natural Horsemanship Halter to Natural Horsemanship